In sound processing, a high-pass filter filters high frequencies above a threshold. In digital images, frequency refers to sudden changes in brightness or color in neighboring pixels. The High Pass filter filters high essential details, and larger scale gradients are removed. This result, combined with the original image and «Soft Light» or «Hard Light» merge mode, is used to sharpen images. It enhances fine details.
4.4.2. Activating the filter
You can find this filter through Filters → Enhance → High Pass… .
4.4.3. Options
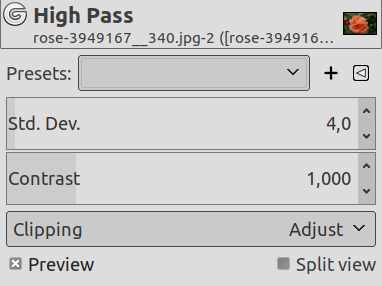
Afbeelding 17.39. “ High Pass ” filter options
Opmerking
Increasing this Standard Deviation lowers the filter threshold and more image details are taken in account for treatment.
Increase/Decrease contrast of treated details.
4.4.4. Using High Pass Filter
Procedure 17.1. Sharpening
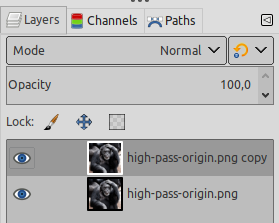
Open your image:
This duplicate layer becomes the active layer.
Open High Pass filter.
Change mode to soft-light (try Hard-light also).
Повышение резкости фотографии
Доброго времени суток, уважаемые друзья! В сегодняшнем видео уроке я покажу вам способ повышения резкости на фотографии с помощью редактора GIMP.
Наверно большинство из вас уже изучило мой видео курс «Азбука GIMP». К чему это я? Дело в том, что к данному курсу есть несколько бонусных видео уроков, так сказать для избранных. А если точнее, для тех пользователей, которые прислали мне свой отзыв на видео-курс.
В одном из бонусных видео речь идет о повышение резкости фотоснимка, за несколько элементарных действий, без использования стандартных плагинов из группы «Улучшение», таких как «Нерезкая маска» и «Повышение резкости». Резкость фото повышается за счет создания дополнительных слоев и использования нужного режима наложения. Но нам же нужна волшебная кнопка, не так ли? Чтобы нажал и фото стало четче. Зачем все эти слои и режимы наложения?
Почти все пошаговые действия, которые рассматриваются в бонусном видео уроке «Резкость», можно автоматизировать, путем установки одного замечательного плагина под названием «High Pass».
Но вначале, сделаю небольшое отступление. Совсем недавно, через обратную связь, я получил письмо с вопросом, есть ли в GIMP аналог фильтра Фотошопа под названием «Цветовой контраст» или как его еще называют «High Pass». Так вот, в стандартной комплектации GIMP, такого плагина нет, но не что не мешает его установить. Не так ли?
Повышение резкости фотографии с помощью фильтра
Шаг 1. Скачиваем и устанавливаем плагин «High Pass»
Шаг 2. Запускаем GIMP и открываем фотографию, которую хотим сделать четче.
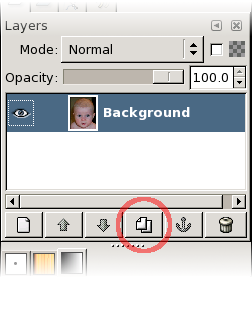
Шаг 3. Далее создаем дубликат исходного слоя, чтобы сравнить результат «До» и «После» повышения резкости фотографии
В открывшемся диалоговом окне задаем радиус, который зависит от исходного разрешения фото. Чем больше разрешение, тем больше радиус и наоборот. И здесь же, с помощью второго ползунка можем выставить непрозрачность слоя с эффектом. Подбирается опытным путем.
854 Затем нажимаем «ОК», чтобы запустить плагин.В результате у нас появиться дополнительный слой «Sharpened» (Резкость).
А исходная фотографи станет намного четче
Шаг 5. При необходимости, с помощью ползунка непрозрачности у слоя, можно отрегулировать степень резкости снимка.
Плюс к текстовому уроку записал еще и видео. Думаю лишнем не будет. Не так ли друзья?
Vidar’s GIMPy high pass filter sketch effect
Text and images Copyright (C) 2004 Vidar Madsen and may not be used without permission of the author.
Intention
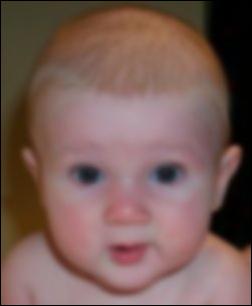
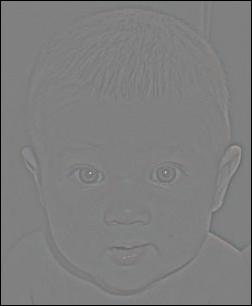
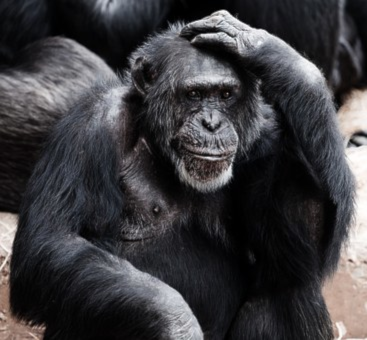
Meet Marius, my son. 🙂
1. High pass filtering
High pass filtering means that we filter away the low frequencies of something, and let the high frequency bands pass. In image terms, this means that the detail of an image is kept, while the larger scale gradients are removed. Luckily, it’s not as complicated as it sounds.
First, duplicate the layer.
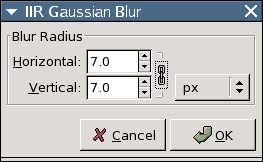
Then Gaussian Blur the top layer with an appropriate radius.
You need to experiment to find good values, but roughly speaking one can say that the larger the radius, the wider the high pass filter’s frequency response, and the “fatter” the lines in the final sketch. In this example I used 7 pixels, giving this result;
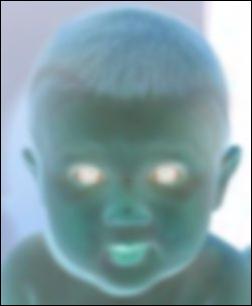
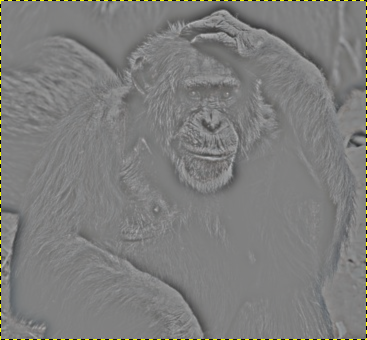
Now we have a low pass filtered version of our image; all gradients and no detail. Exactly the opposite of what we wanted. So, how do we obtain a high pass filtered version? Why, we subtract it from our original, of course. A good way to do that is to simply Invert the image, and blend it 50-50 with the original. First, Image → Colors → Invert ;
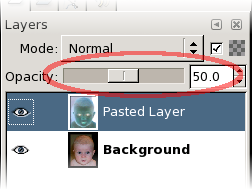
Then, to blend the two, we adjust the Layer’s Opacity slider to 50%, and our high pass filtered image appears;
Now it’s time to Merge the two layers, so that we can continue to process them as one. Right-click on the top layer and pick Merge Down.
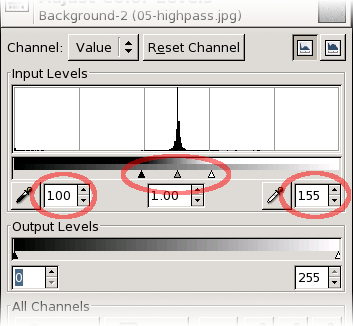
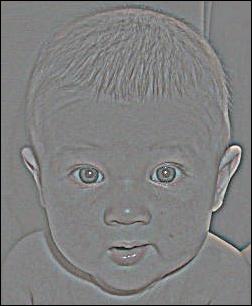
Now, back to the image. Was the effect a bit too subtle, perhaps? While not necessary, we can apply the Levels tool ( Layer->Colors->Levels ) to increase the contrast a bit, so that it’s easier to inspect visually. In this example, I set Input Levels to 100-155;
2. The sketch part
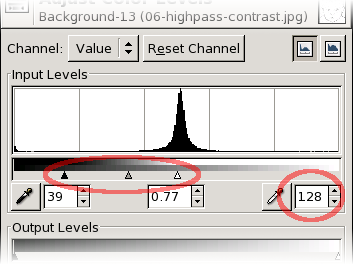
Now it’s time to make the image background white. First, Layer->Colors->Desaturate the image, and fire up that Levels tool again. Here you need to experiment a bit to find the best values for your image. But you will most likely want to set max Input Level (the right value) to 128 or thereabout. This makes the 50%-grey part of the image go white, which is a good start. (If you look at the Levels histogram, you should notice a strong peak in the middle. This is where we want the Max Input Level.)
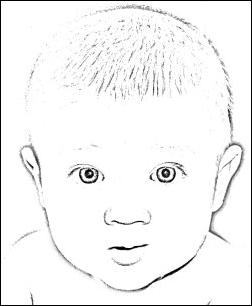
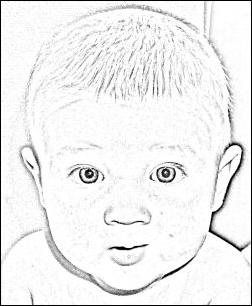
The primary target of experimentation would be the gamma value field in the middle (the grey triangle just below the histogram). With a bit of tweaking, you could end up with something like this;
That’s pretty much it. I tend to want to hand-polish my images to get rid of various imperfections, though. Below is the result of softening the contrast on the lower right region, which is where the bright skin fell against the black background; The higher the contrast, the stronger the lines. I also fine-tuned the overall contrast (with Levels) to get rid of some of the noise in the face;
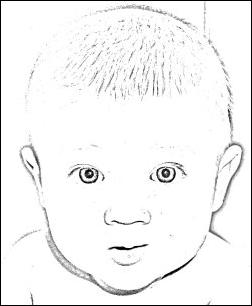
Finally I wanted to remove the annoying shadow below his chin and some of the specks scattered around his face, so I manually hand-brushed away parts of it, giving the final result;
High pass filter in gimp
In sound processing, a high-pass filter filters high frequencies above a threshold. In digital images, frequency refers to sudden changes in brightness or color in neighboring pixels. The High Pass filter filters high essential details, and larger scale gradients are removed. This result, combined with the original image and «Soft Light» or «Hard Light» merge mode, is used to sharpen images. It enhances fine details.
4.4.2. Активация фильтра
Этот фильтр можно найти в меню Фильтры → Улучшение → Высокочастотный фильтр… .
Повышение значения стандартного отклонения понижает порог фильтра, и при обработке учитывается больше деталей изображения.
Повысить/понизить контраст обрабатываемых деталей
4.4.4. Применение фильтра «Высокочастотный фильтр»
Процедура 17.1. Повышение резкости
Сделайте копию слоя:
Эта копия слоя становится активным слоем.
Откройте «высокочастотный фильтр».
Выберите режим «Рассеянный свет» (также можно попробовать и «Направленный свет»).
High pass filter in gimp
In sound processing, a high-pass filter filters high frequencies above a threshold. In digital images, frequency refers to sudden changes in brightness or color in neighboring pixels. The High Pass filter filters high essential details, and larger scale gradients are removed. This result, combined with the original image and «Soft Light» or «Hard Light» merge mode, is used to sharpen images. It enhances fine details.
4.4.2. Aktivering
You can find this filter through Filters → Enhance → High Pass… .
4.4.3. Innstillingar
Figur 17.39. « High Pass » filter options
These options are described in Del 2, «Common Features».
Increasing this Standard Deviation lowers the filter threshold and more image details are taken in account for treatment.