- Beginner Blender: How to Model and Animate a Robot
- A Guide to Making a Robot Character in Blender: Rigging
- Watch the Video Tutorial!
- Text Tutorial – Robot Character Rigging Guide
- (OPTIONAL — Making the Lens)
- Building the Armature
- Adding Bone Parents
- The Magic of Inverse Kinematics
- Setting Up IK
- Final Bone Edits
- And we’re done!
Beginner Blender: How to Model and Animate a Robot
The best way to learn Blender is by getting your hands dirty and working on a project. In this tutorial series, you will model and animate a robot, create a simple scene and render a final video. You will learn how to make the robot we used in the final episode of The Hello World Program, ‘What is Artificial Intelligence?’:
Here’s the final product of this tutorial series:
Download the Blender, audio and image files here: https://github.com/nielsenjared/blender-robot
To use Blender, you will need a keyboard with a numeric pad and a 3-button mouse with a scrolling wheel. If you haven’t already, download Blender. This tutorial was created using version 2.77, but you should be okay with the latest release. After you start Blender, you will see the default setup below. The interface can be a bit intimidating at first, but don’t worry, it will all make sense in the end. The main panel is the 3D View. At the bottom is the Timeline. On the right are the Outliner and Properties.
When possible, I’ll be teaching you keyboard shortcuts, rather than selecting actions via menus. To get good and fast at Blender, you will want to know all the shortcuts, so why not start now? In this tutorial, keyboard and mouse actions will be in BOLD. Shortcuts that read NUM1, NUM2, NUM3, etc. refer to the keys on the numeric pad. LMB and RMB refer to the Left Mouse Button and the Right Mouse Button. In a nutshell, the LMB is used to click buttons and the RMB is used to select objects.
With your cursor in the 3D view panel, press N to open the Transform tab. This provides you information on, and allows you to enter values for, the position, rotation and scale of objects in your scene. We’ll be using it a lot later.
Now press NUM1 to switch to front view and NUM5 to switch to orthographic perspective.
See how the Cube is highlighted in orange? That means it’s the object currently selected.
Press X to delete the Cube.
A popup menu will ask you to confirm. Click with the LMB or press ENTER.
Now that that’s out of the way, let’s build our robot. Press SHIFT+A to access the Add menu. Under Mesh, select Cylinder.
Zoom in with scroll wheel and press Tab to enter Edit Mode. In Edit Mode, you can see the points and lines that compose the Cylinder highlighted in orange. These points and lines are called vertices and edges and 3D objects composed of vertices and edges are called meshes.
With your mouse hovering over the Cylinder, press CTRL+R to access the Loop Cut and Slide tool. You will see a violet line appear around the center of the Cylinder.
Press 2 to create two loops, and hit ENTER twice, once to confirm two loops and twice to confirm placement.
CTRL + TAB opens the Mesh Select Mode menu. Select Edge
ALT + SHIFT + RMB to select the lower loop.
Press S to Scale and type 1.1, then press ENTER.
Select an edge on the upper loop and press ALT + SHIFT + RMB to select all of the edges in the loop.
With the edge loop selected, press G to Grab it, Z to move it only on the Z-axis and type in .5. Press ENTER.
CTRL + TAB and select Face
ALT + SHIFT + RMB to select the upper loop of faces.
Press S to Scale and enter .9, then press ENTER to confirm.
Press NUM7 to switch to top view and RMB to select the circular face.
Press E for Extrude, then ENTER. This creates a new face on top of the old face.
Press S to Scale and enter .5, then press ENTER to confirm.
Press NUM1 to switch to front view.
Then E to extrude a new face, ENTER to confirm and G to Grab, Z to constrain it the move to the Z-axis and enter .2. Then press ENTER.
Switch back to top view with NUM7. Press K to access the Knife tool.
Slice the circle in half by hovering the cursor over the ‘top’ vertex. Click LMB to start the cut, then move the cursor to the ‘bottom’ vertex. Click LMB to place another point, then press ENTER to finalize the cut.
NUM1 to front view, then press NUM2 six times to rotate to the bottom of the mesh.
Select the bottom face.
Using the Knife tool again, with K, slice the circle in half, pressing ENTER to finalize the cut.
That’s the body. Now let’s add a head. Press NUM1 to return to front view, then press Z for wireframe view.
Add a Cube with SHIFT + A.
Scale it down .8 with S. Press ENTER to confirm.
Press G to Grace, Z to constrain the move to the Z-axis, and 2, to move it two Blender units. Press ENTER to confirm.
Scale the Cube on the Z-axis by pressing S, then Z and .6, followed by ENTER.
Press Z to return to solid view. Then select the front face of Cube.
Press E to Extrude a new face and scale it down with S and enter .8, followed by ENTER.
Press NUM3 to switch to side view and press E again to Extrude a new face. Then G to Grab it, Y to constrain it to the Y-axis and enter .1 to move, followed by ENTER to confirm.
Add a Cylinder with SHIFT + A.
Press R to Rotate and X to do so on the X-axis and enter 90 to rotate it 90 degrees. Press ENTER to confirm.
Press S to Scale and enter .25, then press ENTER.
Press G to Grab and, Z to constrain to the Z-axis and enter 2, then press ENTER.
Press G to Grab, Y to constrain to the Y-axis, enter -.7, then press ENTER.
Press NUM1 to switch to front view, then G, X, .325 and press ENTER.
Press Z to switch back to solid view and select the front face of the Cylinder.
Zoom in if you need, using the scroll wheel. Then Press E to Extrude and ENTER. Scale the new face down with S and enter .75, press ENTER to confirm.
Press Z to switch back to wireframe view and NUM3 to switch to side view.
Press E to extrude a new face, then G to Grab it, Y to move it on the Y-axis, and enter .02, then press ENTER.
Switch back to front view with NUM1, and back to solid view with Z. Create a loop cut vertically around the head with CTRL + R. Click LMB or press ENTER to confirm.
That’s the head. Now let’s connect it to the body. Z back to wireframe, then add a new Cylinder with SHIFT + A.
Scale the Cylinder down on the X & Y axes by pressing S and SHIFT + Z to exclude the Z-axis. Enter .15, then press ENTER.
Move the Cylinder up by grabbing it with G, pressing Z and enter 1. Then press ENTER. Next create a series of loop cuts with CTRL + R. Be sure that you mouse is hovered over the neck and that the purple line is horizontal, then enter 32 and hit ENTER twice.
Z back to solid view. While holding ALT + SHIFT, select a vertical edge with the RMB.
Under the Select menu in the 3D View panel, select Checker Deselect
While holding ALT + SHIFT select any horizontal edge with the RMB.
Under the Select menu again, select Edge Ring.
CTRL + TAB and select Face.
Extrude all the faces with E and press ENTER. Press S to scale the selected faces and press SHIFT + Z to do so only on the X and Y axes, then enter 1.1 followed by ENTER.
With the cursor hovering over the neck, press L to select the entire Cylinder.
And SHIFT + H to hide everything else.
Select the top and bottom faces of the neck (hold SHIFT to do so together).
And press X to Delete and choose Faces.
Press ALT + H to unhide the hidden faces.
Now for the arms. Select a face on the neck, and press L to select the entire neck again.
Toggle to wireframe view with Z and duplicate the neck with SHIFT + D. Press ENTER or LMB to confirm.
Rotate the new Cylinder on the Y-axis with R, Y and type in 90, then press ENTER.
Press S to Scale the new Cylinder and SHIFT + X to exclude the X-axis, then type in .75. Press ENTER to confirm.
Grab the arm, G, and move it on the X-axis, X, 1.75. Press ENTER.
Move the arm down with G, Z, and enter -.35. Press ENTER. Press SHIFT + S to access the Cursor menu and choose Cursor to selected.
Add another Cylinder with SHIFT + A.
Rotate it 90 degress on the Y axis. R, Y, 90 and press ENTER.
Then scale it down, S, .15, ENTER.
Move it to the end of the arm with G, X, 1, ENTER.
Press A to deselect the Cylinder.
Now we’re going to cut the mesh in half. Press B to access the Box tool. Click and hold the LMB to draw a box around the left half of the robot.
Press X and Delete Faces.
Our goal is to have a smooth edge down the middle of the mesh. You might need to clean up leftover faces. Use B for the Box tool to select them and X to delete.
Tab to Object mode. In the Properties panel, select the Modifier tab.
Click the Add Modifier button and select Mirror from the menu. The click Apply.
A Guide to Making a Robot Character in Blender: Rigging
Welcome to my new Robot Character series, where I’ll guide you to making a fully rigged and polished robot character in Blender 2.8. This series will be split into a few sections. This is part 2.
- Modelling I
- Rigging (Using IK)
- Modelling II (Details & Kitbashing)
- Materials and Environment Setup
NOTE: Before doing this, you should have the model from the first tutorial. We’ll be setting up an armature rig and if your model is different, the bone placement and IK settings will differ and might not work correctly. I specifically am rigging a bipedal model, with 3 bones in the legs and a single arm, also with 3 bones.
If you’re too lazy to follow the first tutorial and just want to get to rigging, download this .blend and use it. It is the unrigged basemesh that you’d get at the end of the first part.
Watch the Video Tutorial!
Text Tutorial – Robot Character Rigging Guide
First, I’m going to make a cosmetic modification to our model by changing the lens. Make sure you have the BoolTools addon (we’ll be using it later). It’s packaged by default in Blender 2.8, but you may not have it enabled so check in Edit > Preferences > Add Ons > Search [Bool Tools] > Check [Enabled].
(OPTIONAL — Making the Lens)
Now this part is difficult to explain, so it is easier to watch the video.
Add a circle and extrude it inwards, then vertically to get a solid ring. Use the BoolTools > Difference Brush option to cut into the mesh. I’ll have a more detailed explanation of BoolTools in the future.
Disable the modifiers and extrude the cut inwards, bridiging the edge loops with Ctrl + E > Bridge Edge Loops.
Then, we will repeatedly extrude and inset the inner circle of the lens, until it looks like this.
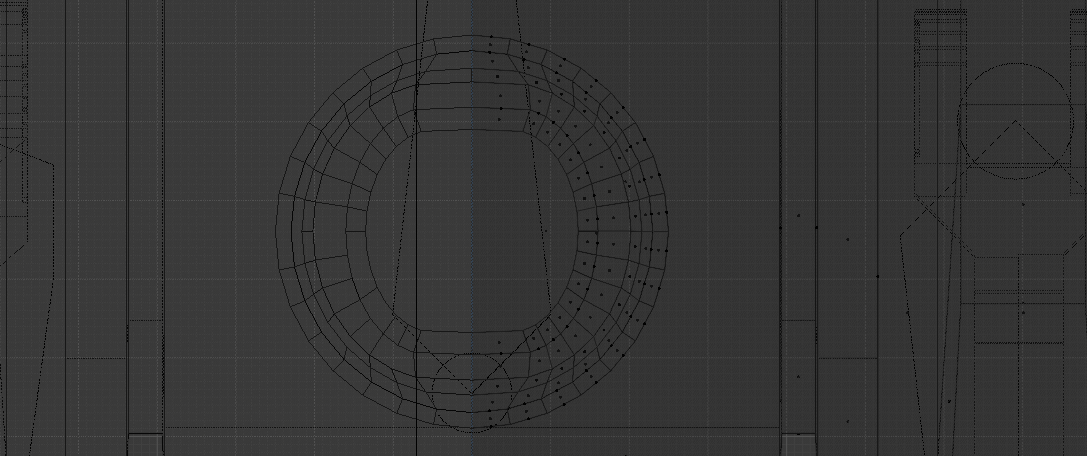
Again, this is quite hard to describe and much easier to watch and follow, so I suggest you do this.
Building the Armature
Time to start rigging! Rigging is the process of adding “bones” to create a “skeleton” to control our 3D model. Sure, we could move each of the objects individually, but that’s incredibly tedious and will likely involve you quitting Blender entirely. This is a first step in creating any animated 3D character, so pay attention!
Our robot has the advantage of being composed of discrete objects, and we won’t be directly deforming any meshes, which would require weight painting and other more complex techniques. Instead, we only need bones to manipulate the robotic arm and two legs.
First, we’ll set up an armature by going to Object Mode, and adding an armature by Shift-A > Armature. It should be generated at the world origin. We want to move it up and roughly centre it on the robot body.
Our first bone is sort of our root, in that it controls our robot’s main body chassis.
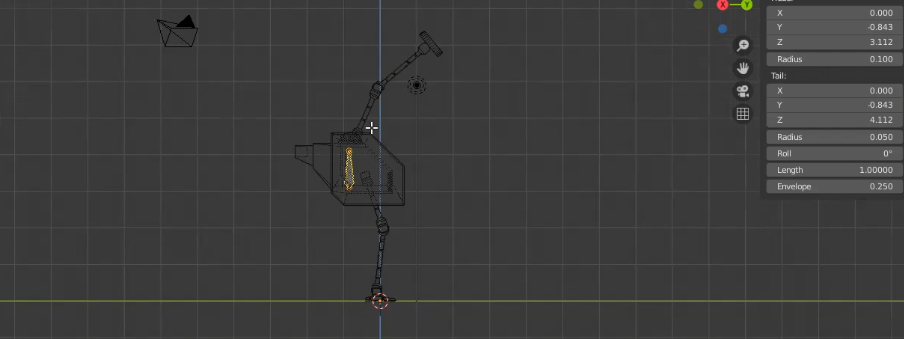
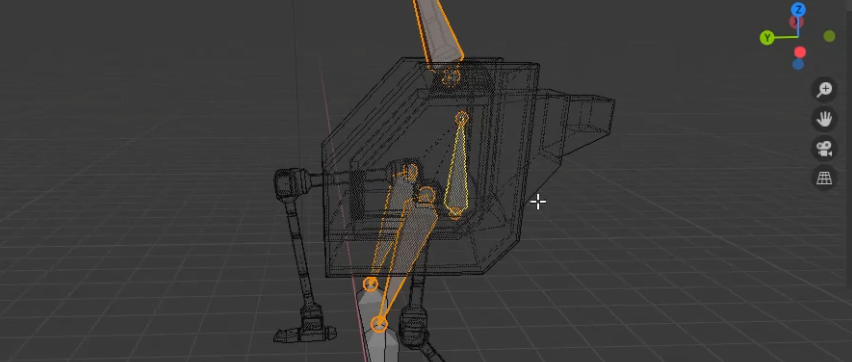
Next, we’ll add bones to the arm. In our bone’s edit mode (Accessed by tab), you’ll want to hit Shift-A and a new bone will be automatically added to the world at the origin.
Move this up to the base of the arm, with the lower handle (the larger end) situated at the top of the chassis, and the upper handle at the joint. Then, with the upper handle selected, extrude (Ctrl + E) the bone and place it at the next joint. We’ll do this one more time for the small cylinder (It’s supposed to be an electromagnet) at the end.
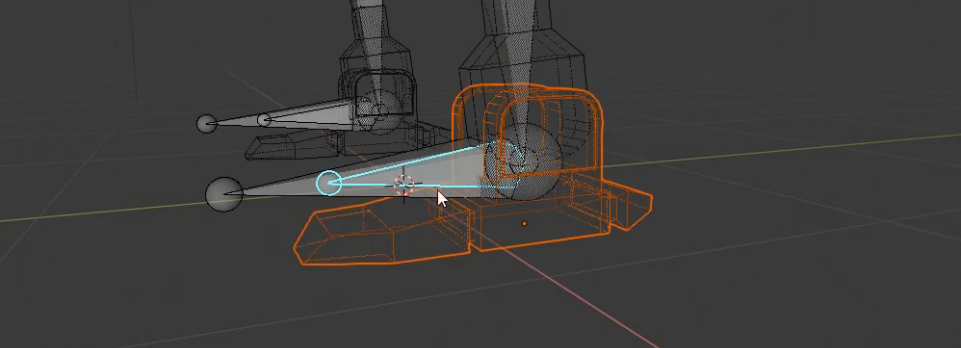
When you’re done, you’ll have a total of four bones — three in the arm (shown below) and the body bone we placed before.

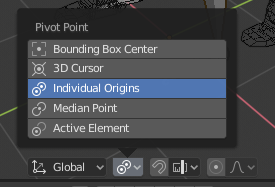
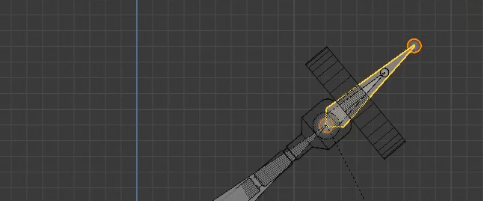
You’ll duplicate the bone at the end and this is our IK handle. Scale it up (set the pivot point to Individual Origin) so it’s a bit bigger than the magnet bone.
You MUST unparent the IK handle, by hitting Alt-P > Clear Parent! This caused me a lot of trouble, so don’t do it!
The final result, which I’m calling the “IK handle” will look a bit like this:
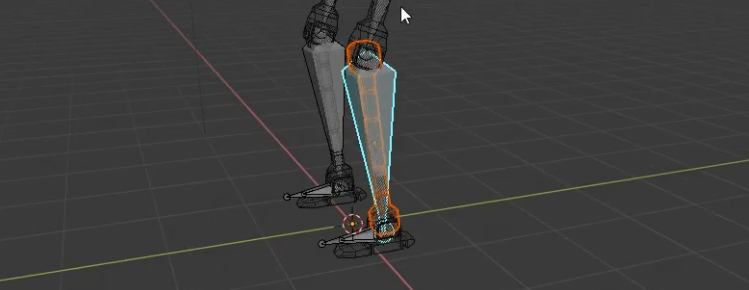
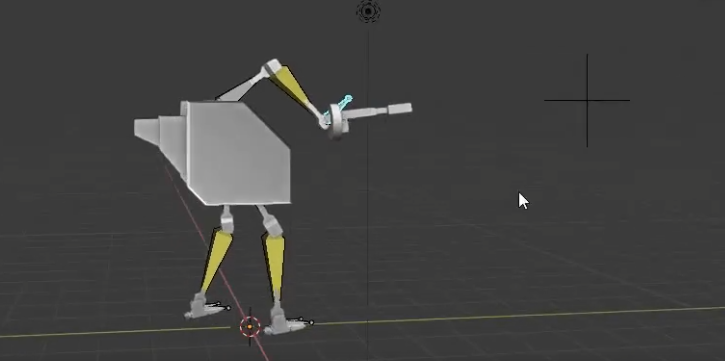
Now, let’s repeat the process for both of the legs. I find it easier to just create one leg in side view and then duplicate it so we have both legs.

It should look like this when we’re done, with the same duplicated “IK handle” bone at each foot.
Hit Tab once again to go into Pose mode, and then try to play with the bones. Rotate them and move ‘em around. Wow! Nothing happens.
That’s because we haven’t assigned the bones to anything yet. Let’s do that now.
Adding Bone Parents
Make sure you’re still in pose mode!
Starting from the feet: Select first the foot object and then the small foot bone (not the one we’ll be using as our IK handle) and then parent the foot to the bone by Ctrl + P > Bone. It is essential that we have the armature as the Active Object, otherwise this option will not appear!
Now we can play with the foot bone and it moves the foot!
We’ll be doing this for the rest of the bones so get comfortable. The general procedure is as follows:
- Select the object — the arm piece, leg piece or whatever it is.
- Select the corresponding bone in the armature while in Pose Mode. They should be overlapping.
- Parent with Ctrl + P > Bone.
- DO NOT TOUCH THE IK HANDLE BONES!
This is what the leg looks like.
Now, the magic: You can move any of the bones and you have a skeleton that can walk and dance and talk (except my robot doesn’t have a mouth)!
However, you’ll quickly notice that it’s pretty tedious to position the arm and legs. We have to transform each of the bones individually, starting from the one closest to the body and then outwards to the extremities.
This is where our _second dose of magic _comes in.
The Magic of Inverse Kinematics
Now instead of moving our bones from the root first, there’s a system called Inverse Kinematics, where we move the tail first and the rest follows. Think about how your own hands move.
If you want to pick up a bottle of, say, _delicious motor oil, _you don’t think of how you’ll move your upper arm, then bend your elbow, then your wrist. Rather, you move your hand to the bottle and then the rest of your arm naturally follows. The same thing happens with IK.
Setting it up is incredibly easy too, which is a bonus. We won’t be going too in depth here, but it would certainly help if you did some more research on pole targets and chain lengths and such.
Setting Up IK
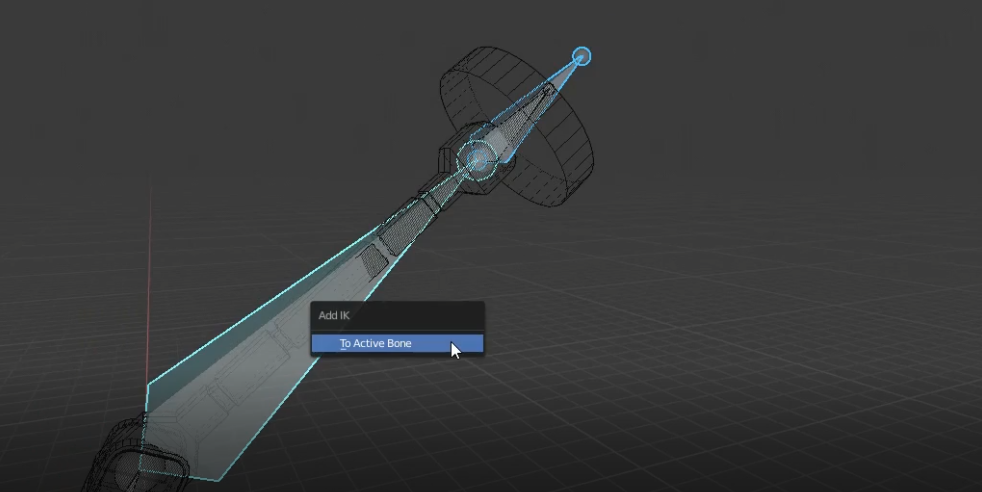
Starting with the arm: Select our IK handle (making sure they’re disconnected, so if you grab one and move it, check that there’s no dotted line between it and the handle, otherwise you need to clear the parent with Alt + P) and then the “second bone” in the chain. This would be the calf area for the legs (the first bone would be the foot), and the forearm region for the arm (the first being the hand).
With the second bone selected, hit Shift + I > Add IK to Active Bone. Here’s what the arm looks like. The lighter blue bone is the active element here.
Now try moving our IK handle. Magic!
Do the same thing for each leg now. Add IK to the calf-bone with the IK handle as the inactive object.
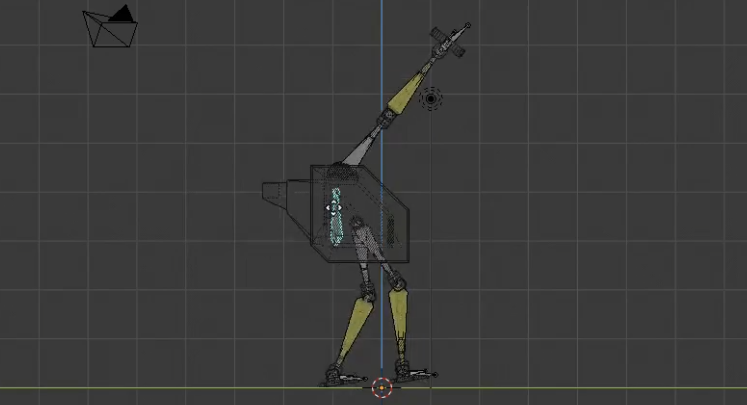
We have a nearly completed rig when we’re done!
While you’re playing with this rig, you might mess up. Don’t worry, you can always reset the position and rotation of all of your bones with Alt-R (Clear Rotation) and Alt-G (Clear Position). This is a handy shortcut in all modelling, not just for bones.
Final Bone Edits
To make the body move everything else around, select the root bones of the legs and arm, then the body bone, and set it as a parent with Ctrl + P > Parent > Keep Offset.
Also, in the video, I make a gun with a cube thats extruded a bit, and parent it to the magnet. We can have it track to an object by selecting our magnet bone, and hitting Ctrl + Shift + C > Track To. An empty target is automatically generated and when we move it around our arm rotates to face it. Pretty cool!
That’s purely optional but still an interesting efffect to have.
And we’re done!
We have a rigged robot character that you can puppeteer to your heart’s content.
For some wild puppeteering, check out the first minute or so of my video.